![logo-1.svg]](https://help.carpages.ca/hubfs/logo-1.svg)
Video Guide and Steps Below
Step 1: Open your list of posts
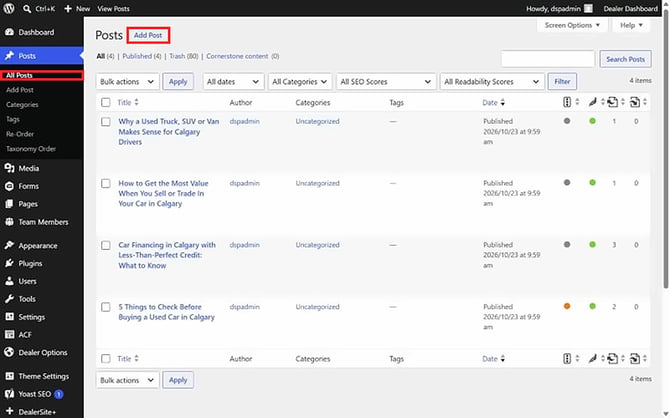
In your website admin, click Posts, then All Posts. Use the search box above the list to find a post by its title. If you have many posts, use the filters above the list, such as All dates or All Categories, to narrow it down.
Step 2: Edit an existing post
Click the post title to open it. Make your changes in the editor, then click Save (or Update) in the top right corner to save them to your live website.
Tip: Click Preview before you click Update to see how your changes will look.
Step 3: Schedule a post for later
Open the post and click the Publish date in the right-hand panel, where it says Immediately. Choose a future date and time. The Publish button changes to Schedule, so click Schedule to confirm. The post goes live automatically at that time.
Step 4: Change a post back to a draft
Open the post, click the Status value (for example Published) in the right-hand panel, and choose Draft. The post is removed from your website but stays in your Posts list so you can finish it later.
Step 5: Delete a post
In the Posts list, hover over the post and click Trash. Trashed posts move to the Trash tab at the top of the list, where you can restore them by clicking Restore. Only click Delete Permanently if you are sure you won't need the post again.
Step 6: Organize your posts with categories
Click Posts, then Categories. Type a new category name and click Add New Category. You can then choose that category in the right-hand panel when you edit any post.
Frequently Asked Questions
Why can't I see my changes on my website?
After you click Update, refresh your blog page. If you still see the old version, try a private browsing window or clear your browser's cache.
How do I bring back a post I deleted by mistake?
Go to Posts, then All Posts, and click the Trash tab. Hover over the post and click Restore.
Why is my scheduled post still not live?
Check that the post status says Scheduled and that the date and time are correct. It will go live automatically at the time you chose.